Quick Start
Local Presenting
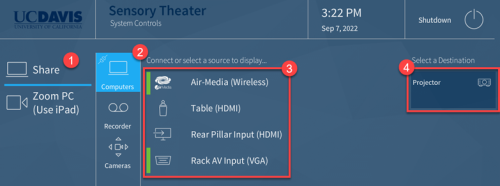
Touch the screen on Controller Tablet and connect device. Then select Share > Computers > Source > Destination (Projector). Use HDMI or Air Media first, VGA should be last option.
Zoom Meeting
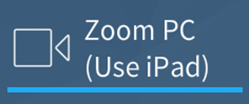
Click Zoom PC on the Controller Tablet, then from the Zoom iPad start a New Meeting or Join. Back on the Controller Tablet, make sure to select a source from the Content section. The under Cameras, select Cameras to wake up the camera.
Whiteboard Camera
On the Controller Tablet select Zoom PC. From the Zoom iPad at the home screen or while in a meeting, select Share Content > Whiteboard Camera > Huddy Canvas.
Recording
Start presenting from above instructions. Verify then camera, microphone, and audio setting are ready (see Record Lecture section for detailed instructions). Go to the Recorder section and press Record. Contact BFTV IT ([email protected]) for access to recordings. Let them know if it is a reoccurring class and provide schedule.

Power Down
When finished, please shut down system. Click the Shutdown button in the upper right, then click Shutdown again to confirm.
Local Presenting (detailed)
- Touch Screen to begin
- Select Share > Computers
- Select a Source:
- AirMedia (Wireless): Wireless connect over Eduroam/UCD-Guest to projector (see AirMedia Connection section for connection details).
- Table (HDMI): HDMI Cable under table at front of the room.
- Rear Pillar Input (HDMI): HDMI port at the pillar in the back of the room.
- Rack AV Input (VGA): [Try others first.] Use long VGA cable to connect to computer. Contact [email protected] prior to your event if you need to borrow a long VGA cable.
- Select Projector under Destination section:

Record Lecture (detailed)
The room could record offline lectures. It will track and record presenter at front, record the audio from wireless mics, and capture any media displayed to projector. Audio requires wireless microphones. Video requires camera to be awake. Do not turn off projector or system during recording.
- Connect to projector if displaying media to screen, use the Present to Screen section.
- Wake Camera by selecting the Camera button under Cameras and selecting view (see Camera Function section for more details).
- Turn on microphone(s) so that audio can pass through the recording and the room speakers. Store microphones in top drawer of A/V rack when not in use.
- Adjust room volume from the bar at the bottom right of screen.

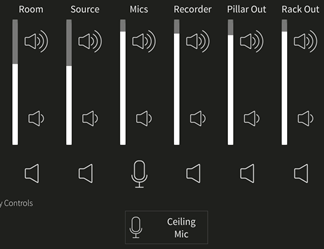
- Click on the gear on the bottom left > Audio Mixer, then verify that it is like the setup below. Click Ceiling Mic to mute/unmute the ceiling microphone.
- Adjust room volume from the bar at the bottom right of screen.
- Begin recording after Audio/Video/Projector is set up by going to Share > Recorder > and then clicking
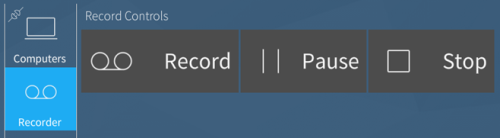
- Stop recording when completed by hitting the Stop button.
- After 1-2 hours, depending on duration of recording, the video will automatically upload to AggieVideo.
- If you have already made arrangement with BFTV IT, they will assign it to you at video.ucdavis.edu so that you can have access to the video.
- Please email BFTV IT at [email protected] with the date and time of your recording so that it may be assigned if you have not already made arrangements, or to get a status update.
AirMedia Connection
The AirMedia Device allows you to wirelessly connect to the Projector with just an internet connection.
- Connect to Eduroam or UCDGuest, instructions posted in the room.
- Select AirMedia as a source from Present to Screen section.
- Go to URL displayed on lower left of projector: http://169.237.216.133
- Download and run the app for your OS.
- If prompted for an IP Address, or to connect manually, use the 169.237.216.133 displayed on the screen.
- Use the 4-digit PIN from projector screen when prompted, displayed on the lower left, as it changes each time.
- macOS users: You may need to go to System Preferences > Displays to view AirPlay settings.
- Select Sensory Theater AirMedia from the Dropdown next to AirPlay Display.
- Relaunch AirMedia App if you do not see it as an option and closely read any pop-up messages.
- It may require additional permissions to record the screen to the projector. Follow the prompts.
Zoom Room (detailed)
- Click Zoom PC on the Controller Tablet
- From the Zoom iPad click Join to join an existing meeting or New Meeting to start a new one.
- Back on the Controller Tablet
- Highlight Camera under the Cameras section to wake camera (see Camera Function section for more details).
- Go to Content and select source you are sharing (HDMI/AirMedia/VGA).
- On the Zoom iPad you can mute/unmute microphone, start/stop video, stop content, and end/leave meeting.
- To use the Whiteboard Camera, select Share Content > Whiteboard Camera > Huddly Canvas
Camera Function
- On the Controller Tablet, you can go to the Cameras section.
- Wake camera by clicking the Camera button.
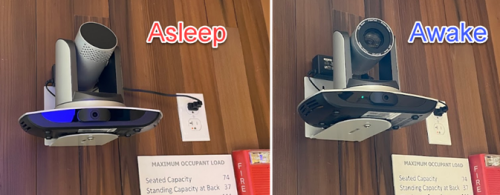
- If still asleep, click the eye icon at the bottom of screen so that it appears blue. It may require you to click twice.

- Wake camera by clicking the Camera button.
- Select a preset option
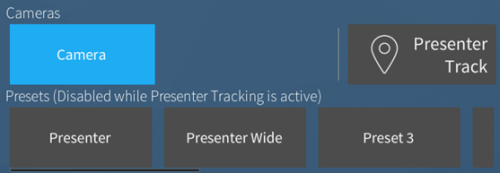
- Camera: Enables/Disables Camera
- Presenter: Default view zoomed into from right of room by AV rack.
- Presenter Wide: Preset view of entire front area.
- Pan/Tilt Zoom: Manually moves camera. With slight delay in preview.
- Presenter Track: Once pressed, it will start tracking the person in from of the AV rack after 5 seconds. Even if others move into scene. Repeat wake cycle before recording to change tracking. Do not do during recording. The camera will follow a new presenter if primary walks out of view. While this option is use, the other camera options will not be available.